
Note: There is a video version of Using the Zone System with Polaroid SX-70 Film, Part 1 at the bottom of this post.
SX-70 film is a remarkable feat of engineering. To think that the entire photographic process—taking a photo, developing the negative, printing the negative, developing the print, framing the print—is all done in one step: take the photo and a finished, framed print is ejected!
That magic comes with a few downsides, the most concerning being the limited latitude or dynamic range of the film. While most camera films might be expected to have a dynamic range of 8-9 f-stops between black and white with an extensive range of grey values in-between, SX-70 film has a much smaller dynamic range. Simply put, SX-70 film is extremely contrasty. The film loves low contrast scenes shot in overcast conditions but good luck capturing a bright sunny scene with deep shadows.
In an effort to gain some level of creative control over the SX-70 film’s limited latitude, it occurred to me that the Zone System might be worth exploring.

The Zone System was developed by photographer Ansel Adams and Fred Archer in the 1930s. As Adam says in the 1978 edition of his book Polaroid Land Photography “My objective was to bring the basic sensitometric facts out of the film manufacturers’ laboratories and make them function, within reasonable limits of accuracy, in all aspects of applied photography, particularly in the realization of personal creative statements.” In other words, the Zone System is a means for the photographer to pre-visualize how a picture will appear in a negative and print, by knowing how the film interprets the photographer’s subject.
I used the Zone System throughout my black and white film days, from the late 1970s to about 2000. I worked with cameras ranging from a swing lens 35mm panoramic camera to 4” x 5” large format cameras and, finally, a Cirkut No. 6 Outfit, which produced full-circle 6” x 60” negatives. The Zone System allowed me to assess a scene, figure out where all the tones would fall at a given exposure time and aperture setting, whether I should alter my negative development to increase or decrease the contrast of the negative and how the final print might look. That pre-visualization took place before the camera’s shutter release was even pressed.

A key to understanding the Zone System is the construction of a Zone Ruler (or Zone Scale) using a specific film. The how-to instructions I used years ago and, once again, for my current Polaroid work are from The New Zone System Manual (1976) by Minor White (yes, that famous photographer), Richard Zakia and Peter Lorenz. The idea is to photograph a white, textured subject based on an exposure meter reading of the subject and the ISO (film speed) of the film. This should result in a Zone V value. All meters are designed to read any subject they are pointed at as a neutral 18% grey. Therefore, Zone V is 18% grey, a rather dark grey tone. Subsequent exposures are taken at one EV intervals: EV-1 (the metered Zone V exposure value minus one), EV-2, EV-3, EV-4, EV-5 and EV+1, EV+2, EV+3, EV+4.
A side note about EV (exposure value): this is a neutral term that describes one full f-stop difference or one full shutter speed difference. For example EV+1 describes changing an aperture setting from f/8 to f/5.6 or the shutter speed setting from1/500s (second) to 1/250s. If an exposure meter indicates an EV of 13 for a given subject, with a 100 ISO film the photographer could use an exposure of f/8 at 1/125s or f/2.8 at 1/1000s. Both will result in the same EV 13 exposure.

To build a Zone Ruler for conventional black and white films like Ilford HP5, the negatives are developed normally and then each film frame or sheet is printed in exactly the same way (same exposure, same development time, same paper, etc.). Laying the prints out in order from EV-5 to EV+4 will show each zone as a stepped greyscale stretching from solid black (Zone 0) through middle-grey (Zone V) to untextured white (Zone IX). Normally, Zone III would represent a shadow (or dark) area with textures still visible and Zone VIII would represent a bright highlight that had minimal textural value.
With conventional film, the photographer could take readings of a subject and determine if shadow and highlight details are falling in the desired zones and, if not, determine if negative development should be changed, for example, by increasing/decreasing development dilution to bring those tones into the desired zones. Adams calls this N+1, N-1 (and so on) development and it is something determined—pre-visualized—before the photo is taken.
Adapting the Zone System to SX-70 film is limited by the baked-in structure of SX-70 film.

Because the processes involved in creating a Zone Ruler with conventional film—exposing, negative development and printing—are all done in the self-contained (integral) environment of the SX-70 film, there is no way to alter negative development time in order to increase or decrease the tonal range of the negative. And there is no opportunity to enhance print quality by adjusting paper grades, development time, dodging and burning, etc. With SX-70 film, it all happens in 15 minutes or so, once the film is ejected from the camera. All the photographer can do is watch. Therefore, application of the Zone System with SX-70 film is limited to the selection of a good exposure time, before the shutter is pressed.
That’s the background. Now let’s construct a Zone Ruler.
Basic Equipment Requirements

The camera must allow manual adjustment of either shutter speeds or aperture f-stops or both. That requires a camera such as the MiNT Camera SLR-670-S as previously reviewed.
A good spotmeter is required in order to take detailed readings of the shadows, highlights and mid-tones of a scene. Since the late 70s, I have use an Asahi Pentax Spotmeter V capable of taking a one-degree spot reading. The meter is long out of production but I have seen used units available on eBay. Also found on eBay is an inexpensive “Zone VI” sticker that is applied over the Spotmeter’s exposure dial. It’s a useful visual aid for converting EV readings from the meter into zones on the exposure dial.

Alternatively, there are several smartphone exposure meter apps that also have spotmeter functions. Of those, I would recommend the free version of Lumu Power Lightmeter or LightMe (which can also emulate basic Zone System functionality).


As a third option, many DSLRs, such as my Olympus OM-D EM-1, have a spotmeter option.
Taking the Photos: Round One
For my target, I used a clean white bath towel with a good nubbly texture, stretched over a piece of corrugated board and taped tight with masking tape. The SX-70 folding camera focusses down to 10” so my 14” tall target was large enough. It’s tough to find a vacant wall surface in our house so I mounted it on a wood door panel using green painter’s tape.

Photo lights—Savage 50WLED fixtures, putting out the equivalent of 350 watts each—were placed on each side of the target aimed at 45˚ to the centre of the target to evenly light the target edge-to-edge.
My tripod-mounted MiNT SLR670-S camera was positioned with the white target filling the viewfinder. A vintage Polaroid cable release helped avoid camera shake.
The target, lights and camera were set up in a relatively dark dining room because it has no major window light. I didn’t want stray light to affect my exposures and it’s also a good place to leave the set-up for a day or two, time enough to complete the project.
My tests were done with Polaroid Color 600 film with an ISO of 640. It would be preferable to have several packs with the same production date and number (as printed on the film boxes). Unfortunately, the stock I had on hand were not. I suspect that film from the same production might be more consistent in film speed.
Taking a reading of the target with my spotmeter set to ISO 640, I determined the correct shutter speed for the camera’s f/8 aperture and transferred this to the shutter dial on MiNT Camera’s Time Machine.
If you try this experiment yourself and find that your meter is falling between shutter speeds at the f/8 setting (for example, between 1/125s and 1/60s), adjust the lights further or closer to the target to get a definite shutter speed at f/8 (for example 1/125s).
The first picture, developed at room temperature for 15 minutes, was my Zone V image. As mentioned above, even though the target is white the exposure meter reads it as an 18% grey.
With a Kodak grey card overlapping the fully developed SX-70 image area, I compared the grey of the card to the image; they need to be a close match. SX-70 images tend to have colour casts—green mid tones and pink highlights are common—which can make the comparison difficult. Squinting sometimes helps.
That first photo was a bit too dark, requiring a retake that I guesstimated to be about +½ EV lighter. Changing the shutter speed would result in a 1 EV adjustment; instead, I used the spotmeter to read the target and move the lights until there was a +½ EV difference. The second photo, taken at the same shutter speed, was a much closer match to the grey card. But this also means the film pack’s speed is slower than its advertised speed by ½ EV. For Polaroid 600 with a stated film speed of ISO 640, my test suggests the actual speed is ISO 480 (a 2x change in ISO speed, from 320 to 640 for example, is the equivalent of 1 EV).
With the Zone V exposure pinned down, it was time to shoot the other zones by adjusting the shutter speed one at a time and taking a picture at each setting. For example, if 1/125s is a good Zone V exposure, four more are taken at 1/250s (Zone IV), 1/500s (Zone III) and 1/1000s (Zone II) and three more at lower shutter speeds: 1/60s (Zone VI), 1/30s (Zone VII), 1/15s (Zone VIII). Zone I and Zone IX exposures are well outside the range of any Polaroid film; there’s no sense wasting film on these.
It takes two film packs to capture seven zones plus additional photos to zero in on a good Zone V exposure; a second Zone V image was taken with the new film pack and visually matched to the Zone V image of the first pack. This was hard to achieve, as will be revealed below.
Zones and shutter speeds were noted on the back of each photo. To avoid confusion when looking at a stack of white towel photos, I also noted the film pack used with a simple “1” or “2“.
Taking the Photos: Round One
My round one photos turned out to be problematic, due to the idiosyncrasies of currently available Polaroid SX-70 film and a shutter speed issue with the MiNT Camera SLR670-S camera.

I discovered that the 1/60s shutter speed on my SLR670-S camera is off by a full shutter speed and actually clocks in at about 1/125s. My Zone IV photo taken at 1/60s was near-identical to the darker Zone III photo take at 1/125s.
I repeated the entire project by shifting my lights further from the target and using a different range shutter speeds. Again, the 1/60s photo was too dark; this time, my Zone VI photo taken at 1/60s was a closer match to Zone V than Zone VI.

For my third attempt, I avoided the faulty 1/60s shutter speed by using one film pack to take Zone V to Zone II photos at higher shutter speeds (1/125s to 1/1000s) and a second film pack to take Zone V to Zone VIII photos at lower shutter speeds (1/30s to 1/4s). Matching the Zone V exposures for different film packs turned out to be a difficult proposition. Not only did film speeds appear to vary from pack to pack (Polaroid is upfront about this, stating on the boxes that film speed can vary ±⅓ EV) but the colour tone shifted as well, with the first pack having a neutral grey tone and the second pack a greenish tone. Trying to eyeball-match a greenish Zone V photo to a greyish Zone V photo is difficult and I definitely didn’t get it right in my third set of photos.

Taking the Photos: Round Two
In the end, I decided to streamline the range of zones to six. This allowed me to take Zone III to Zone VIII photos as well as two photos to zero in on an accurate Zone V, all using just one film pack. I also avoided the problematic 1/60s shutter speed by taking the entire series above or below this speed. I set my Zone VIII exposure at 1/125s and shot at progressively higher shutter speeds to 1/2000s, my Zone IV exposure. As that is the highest shutter speed on the SLR670, I placed a 2x (-1 EV) neutral density filter over the lens for my Zone III exposure.

Success! The final set of six zone photos were nicely gradated cross the Zone II to Zone VII range and fully captured what Polaroid 600 is capable of.
Stay Tuned
In Part Two of “Using the Zone System with Polaroid SX-70 Film”, which I plan to post next week, I’ll make sense of my stack of towel photos, create a Zone Ruler and show some samples of images taken using the Zone System.
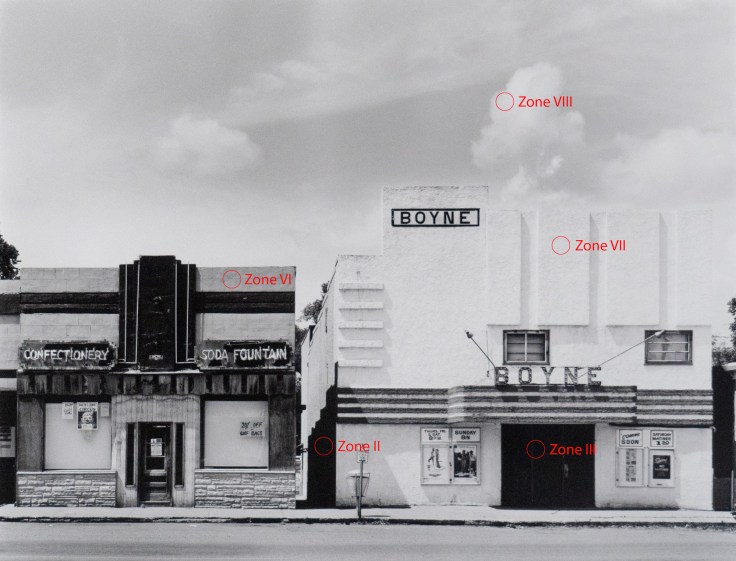
As a teaser, here’s an image taken in a high contrast situation. I used the Zone System to determine where important shadows and bright highlights would fall and chose an exposure time based on my pre-visualization of how I wanted the scene to look. Got it right on the first shot!

Video
Resource List
Reading:
Polaroid Land Photography by Ansel Adams, New York Graphic Society. Out of print but available used at your local used book shop or online at Amazon and Abebooks. Be sure to get the 1978 edition as the 1963 first edition obviously does not include SX-70 film. This is a great, detailed look at all the Polaroid materials with a chapter devoted to using Adams’ Zone System with Polaroid film.
The New Zone System Manual (1976) by Minor White, Richard Zakia and Peter Lorenz. Out of print and harder to find but I have seen it on Abebooks. This practical how-to guide is primarily aimed at conventional film users but the first two chapters are a good introduction to the Zone System and making a Zone Ruler.
Equipment:
MiNT Camera SLR670-S: https://mint-camera.com
Asahi Pentax Spotmeter V: check eBay for used meters.
Zone System stickers for the Spotmeter V: On eBay, search “Pentax Spotmeter V 1/21 III Zone VI Studios System Water Proof Vinyl Pre-Cut”
Lumu Light Meter app (iOS only): Available on the Apple App Store: https://apps.apple.com/us/app/lumu-light-meter/id730969737
LightMe Lightmeter app (iOS only): Available on the Apple App Store at https://apps.apple.com/us/app/lightme-lightmeter/id1509033790
Savage 50WLED Studio Lamps: https://www.bhphotovideo.com/c/product/1182662-REG/savage_50wled_35w_led_studio_lamp.html
If you don’t have a grey card, try a local camera store or buy one online at B & H Photo and othres.
More From Me:
My review of the SLR670-S: https://walkclickmake.com/2021/03/24/the-polaroid-folding-sx-70-on-steroids-a-review-of-mint-cameras-slr670-s/
Instagram: https://www.instagram.com/dfirman/
Firmangallery portfolio and store: https://www.firmangallery.com